
Have you ever needed to trim a long video, extract specific scenes, or merge multiple clips, but found most free tools too basic, too complex, or riddled with ads? Today, I’m excited to introduce JVSplit (Java Video Split), a powerful, free and open-source video splitter designed to make video editing simple and precise on Windows, macOS, and Linux.
As someone who frequently works with video, I built JVSplit for my own needs and now I’m making it available to you. It’s truly a tool that can stand shoulder-to-shoulder with (and often surpass) many free or ad-heavy alternatives.
Why JVSplit is Different (and Better!)
- Precision Cutting: No more guessing! JVSplit lets you move through your video with 0.1-second accuracy to mark your start and end points perfectly.
- Flexible Exports:
- Want to combine multiple segments into one seamless video? JVSplit does it.
- Need each segment as its own separate file? JVSplit handles that too.
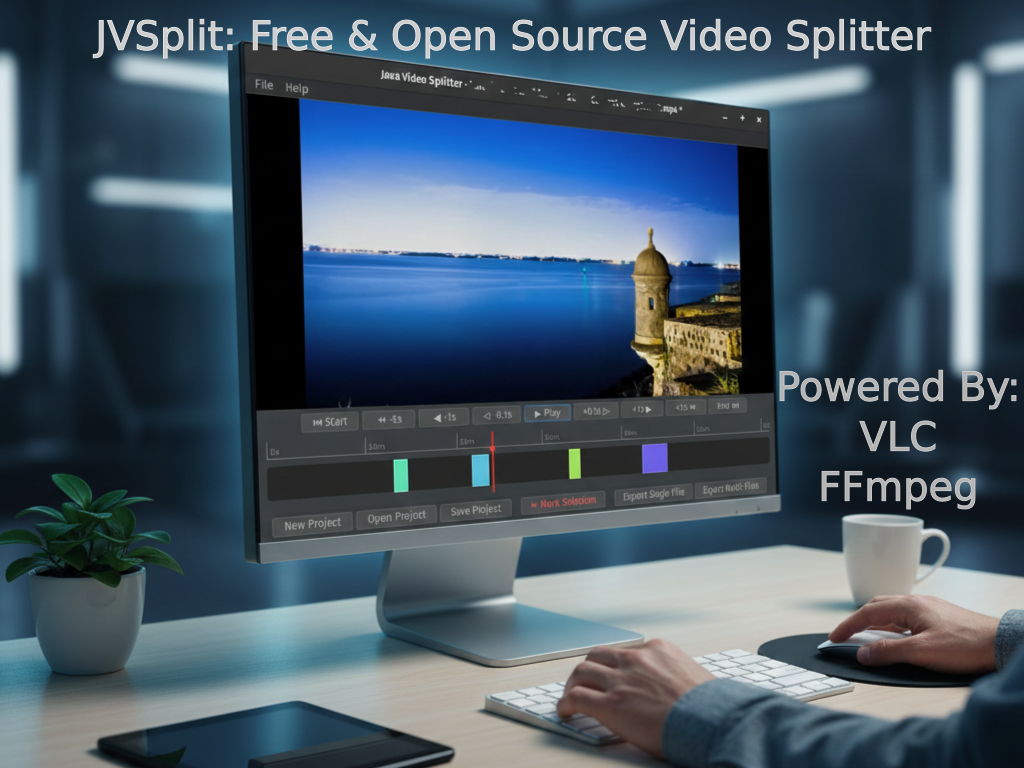
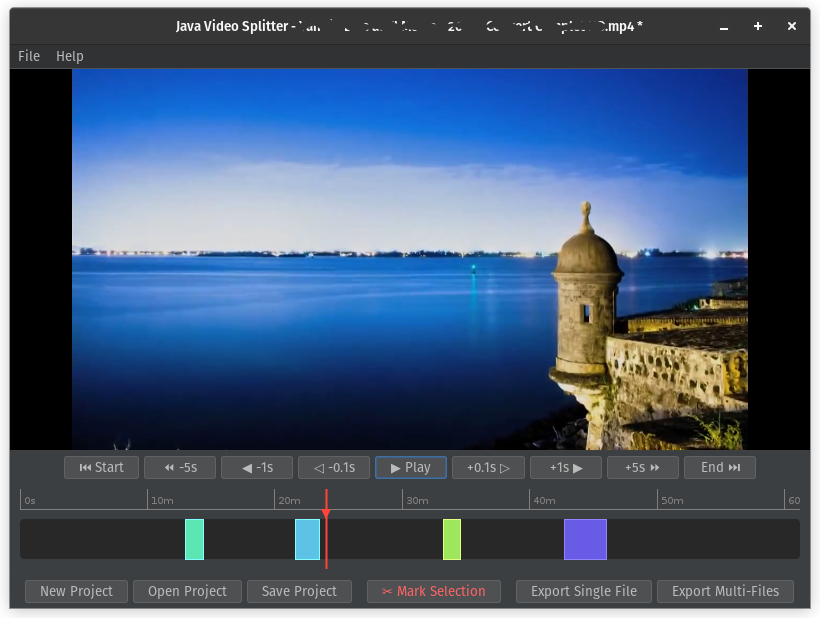
- Intuitive Timeline: Visually manage all your video segments with an easy-to-use timeline, making organization a breeze.
- Open Source & Free: No hidden costs, no premium features behind a paywall, and no annoying ads. Ever.
- Cross-Platform: Works flawlessly on Windows, macOS, and Linux, thanks to its Java foundation.
What You’ll Need (Don’t Worry, It’s Easy!)
JVSplit is a powerful application built on robust technologies. To get it up and running, you’ll need three simple things:
- Java Runtime Environment (JRE) 21 or higher: This is the engine that powers JVSplit. If you don’t have it, don’t worry, it’s a quick, free download.
- Download Java (Oracle JDK) (Choose “JRE” or “JDK” for your operating system)
- Download Java (Eclipse Temurin – OpenJDK) (Recommended for most users)
- VLC Media Player: We use VLC’s powerful playback capabilities. You probably already have it!
- FFmpeg: This is the industry-standard tool for video processing, handling all the actual cutting and merging.
- Download FFmpeg (Look for builds specific to your OS, e.g., “Windows builds” or “macOS builds”)
Important Note for VLC and FFmpeg: After installing, make sure their installation folders are added to your system’s PATH environment variable. This allows JVSplit to find them automatically. A quick search for “add to PATH [Your OS]” will give you clear instructions. If you’re using macOS or Linux, they’re often installed to a location already in PATH if installed via a package manager.
How to Get JVSplit Running & Start Editing
Once you have Java, VLC, and FFmpeg installed and configured with your PATH variable:
- Download JVSplit: JVSplit-Binaries.zip (6.3MB) Source code is available for download on the blog post where I described how I built it using AI without a single line of code.
- Run JVSplit:
- Double-click the
JVSplit.jarfile. - If that doesn’t work, open your command prompt (Windows) or terminal (macOS/Linux), navigate to where you saved
JVSplit.jar, and type:java -jar JVSplit.jarThe JVSplit application window should appear!
- Double-click the
A Quick Guide to Using JVSplit
- Open a Video: Click
File > New Projectand select your video file. - Navigate: Use the playback timeline cursor or the
+/- 5s, 1s, 0.1sbuttons for precise positioning. - Mark Segments:
- Move the playhead to the desired start point and click the
Mark Selectionbutton to add a segment into the timeline component. - Move the playhead to the desired end point and right-click the segment then choose Set selection end from the popup menu.
- Your segment will appear on the timeline below.
- Move the playhead to the desired start point and click the
- Manage Segments: Right-click a segment for options like “Play Selection,” “Remove Segment,” or “Adjust Start/End.”
- Save Your Project: Click
File > Save Projectto save your work (all your marked segments and video path) for later. - Export:
- Click
ExportSingle File to join all segments into one file. - Click Export Multi-Files to export each segment as a separate file.
- Select your output folder, and JVSplit will do the rest! At the end, you will be prompted to open the output video file or the destination folder for a quick view.
- Click
Bonus Tip: Create a Desktop Shortcut for Quick Access!
For Windows:
- Right-click on the
JVSplit.jarfile. - Select
Send to > Desktop (create shortcut). - Right-click the new shortcut on your desktop, select
Properties. - In the “Target” field, change it from something like
C:\Path\to\JVSplit.jarto:javaw -jar "C:\Path\to\JVSplit.jar"(Make sure to use the actual path to yourJVSplit.jarfile). ClickOK. Thejavawcommand runs Java applications without opening a command prompt window in the background.
For Linux (Gnome/KDE Desktop – General Steps):
- Right-click on your desktop and select
Create LauncherorCreate New > Link to Application. - For “Type,” select
Application. - For “Name,” enter
JVSplit. - For “Command,” enter:Bash
java -jar /path/to/JVSplit.jar(Replace/path/to/JVSplit.jarwith the actual path). - You can also click the icon to set a custom icon for JVSplit if you have one.
- Click
OKorSave.
I genuinely believe JVSplit will become an invaluable tool for your video editing needs. Give it a try, and let me know what you think!


One response to “Introducing JVSplit: Your New Go-To Free Video Splitter (Works on Windows, Mac, & Linux!)”
Hi there colleagues, good piece of writing and pleasant arguments
commented at this place, I am actually enjoying by these.