

The era of “coding” as we know it is evolving. We are entering a phase where the most valuable skill isn’t knowing where the semicolon goes, but knowing how to describe a system so precisely that an AI can build it for you.
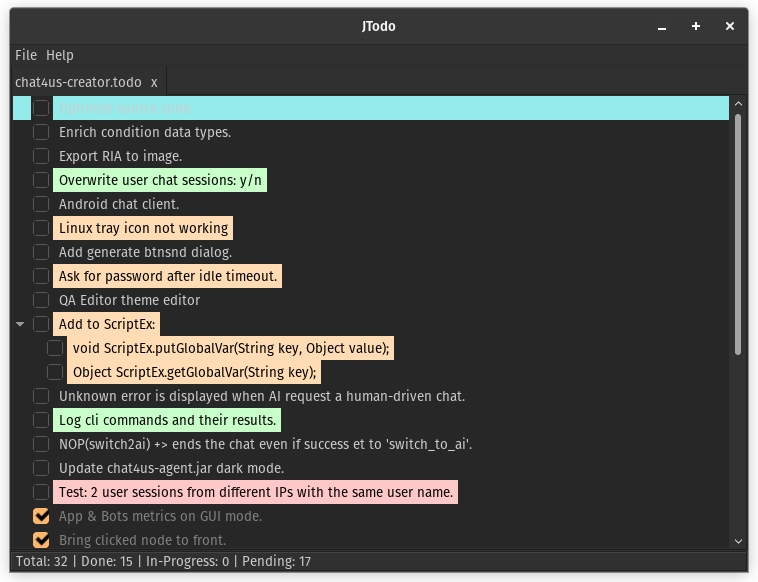
Last week, I developed a fully functional light weight Java-based ToDo application. Total lines of code written by me? Five. Here is the exact workflow I used to turn a simple idea into a modular, production-ready application using Large Language Models (LLMs).
Pro Tip: The method outlined in this article achieved success exclusively with Gemini 3 Pro, while the identical approach proved unsuccessful when applied with Gemini 3 Thinking.
1. The “Architect First” Mindset
Most people fail with AI because they treat it like a search engine. They ask, “Write me a ToDo app,” and get a monolithic, buggy script. Professional results require professional structure.
Pro Tip: Use a mindmap tool (like XMind or Freeplane) to conceptualize your project. Break your big idea into small, independent parts: packages, modules and libraries.
2. The Spec-Driven Workflow
Before a single file is created, you must establish a “Technical Contract.”
Step 1: The “Prompt for a Prompt”
Instead of writing the technical requirements yourself, ask an LLM to do it. Provide your rough draft and say: “Based on these requirements, write a comprehensive technical prompt that translates my needs into constraints an AI coder can follow (modular architecture, error handling, specific libraries).”
Step 2: The “Agreement” Phase
When you start the development chat, tell the AI: “Do not write any code yet. Let’s first agree on the technical requirements, file structure and dependencies.” This prevents the AI from “hallucinating” a half-baked solution before it understands the scope.
3. The File-by-File Integration
Never ask for the full code at once. Even the best models lose context after a few hundred lines.
- Initialize: Create the project in your favorite IDE (IntelliJ, VS Code, Eclipse).
- Execute: Ask the LLM to generate code file by file or class by class.
- Integrate: Copy the code, run it and check for errors.
4. The Feedback Loop
Your first run will likely hit a snag—a missing feature, a weird UI glitch or an unhandled exception. This is part of the process. Integrate > Test > Give Feedback. Describe the “weird behavior” to the AI and let it provide the tweaks.
Real-World Example: The Java ToDo App
Here’s the draft I used along with the prompt that created my app. The AI model might offer suggestions, point out missing key details or ask for additional technical information…
You are a professional software engineer and I need you to write a comprehensive technical prompt for <ai-model-name> that translates my needs into constraints an AI coder can follow to write the required code. If you need more information or clarification about the project, feel free to ask. Crutial: Include every single detail in the generated prompt. The following is the draft ideas I wrote:
I need a light weight GUI Swing Java 11 (POJOs) app that stays running so I can review/edit my project's todo(s) any time I need to.

A single Window that is composed of:
- Main Window:
	- System L&F so the app can handle Dark/Light system modes.
	- Closes into system tray icon if supported by OS and successfully created.
	- Quit by clicking on File > Exit from the main menu or system tray popup menu.
	- Remember window bounds (settings.cfg).
	- Auto open todo lists that were apened when the app last exited (settings.cfg).
- Main Menu:
	- File:
		- New Todo List: Let the user to create a XML .todo file for the todo list using the save dialog.
		- Open Todo List: Let the user to open a XML .todo file that contains a todo list using the open dialog.
		- Exit: Close the main window and quit the app.
	- Help:
		- About: Shows an about dialog.
- Tabbed Pane:
	- Each opened todo list has its own tab.
	- Each tab has its own close button.
	- Each tab has tooltip that shows .todo file absolute path.
- Status bar:
	- Total: # | Done: # | In-Progress: # | Pending: #
- System tray:
	- Click: shows popup menu:
		- Show JTodo: Shows the main menu.
		- Exit: Close the main window and quit the app.
	- Double click: Shows the main window.

Todo entries:
	- Entries are stored into (Java independent) XML files.
		- Each entry edit is saved automatically into disk (Avoid freezing UI).
	- Each entry shows: Checkbox state and its text. Background color as defined later.
	- Entry tooltip text: Date/Time when it was created and when it was done/checked.
	- Checked/Done entries are topmost on the other hand Unchecked ones are exclusively at the bottom.
		- Same order for children entries.
	- User can edit an entry either by double-clicking on it or by pressing F2. Enter for validation, Esc to cancel edit.
	- When a parent todo entry is checked/unchecked, all its children also take the same state automatically.
	- Entries can be moved using keyboard: Alt+Top: Move an entry one step to top, Alt+Bottom: Move an entry one step to bottom. Entries should stay within the same group (checked/unchecked).
	- Entry priority: High: Light Red, Medium: Light Orange, Low: Light Green, None: Default. Background color.
	- Entry status tracking: Pending: Unchecked state, In-Progress: Unknown/Partial state, Completed: Checked state. Selected entry is automatically moved down all pending/in-progress entries, up of all checked/completed ones.
	- Completed entries should be shown in default bkg/fgr color so user can focus more on pending/in-progress entries.
	- Entry popup menu:
		- Edit: Start editing entry.
		- Priority:
			- High: Toggle high priority.
			- Medium: Toggle medium priority.
			- Low: Toggle low priority.
			- None: Toggle None priority.
		- Tracking:
			- Pending: Toggle pending/unchecked state.
			- In-Progress: Toggle in-progress/unknown state.
			- Completed: Toggle completed/checked state.
		- Delete: Delete the entry. Needs user confirmation.
		- Add Child Task.
	- When user right-click an empty area of the list, a popup menu is shown:
		- New Entry: Add a new entry at the bottom of unchecked entries.
		- Clean Done: Removes all done/completed todo entries. Needs user confirmation.
		- Expand All: Expand all entries and their children
		- Collapse All: Collapse all entries and their children.
Role: You are an expert Java Desktop Developer specializing in Java 11, Swing, and clean POJO-based architectures.

Project Objective: Build "JTodo," a lightweight, hierarchical Todo list manager. The application must be self-contained, using only standard Java 11 libraries (no external frameworks like Spring or Hibernate).

1. Technical Stack & Environment
	- Language: Java 11.
	- GUI Library: Swing (javax.swing) with System Look & Feel (L&F).
	- Persistence: XML for Todo data; a flat settings.cfg for app configuration.
	- Concurrency: Use SwingWorker or CompletableFuture for all File I/O to ensure the Event Dispatch Thread (EDT) never freezes.

2. Core Data Structures (POJOs)
	- Create a TodoEntry class with the following properties:
	- String id, String text, Priority priority (HIGH, MEDIUM, LOW, NONE).
	- Status status (PENDING, IN_PROGRESS, COMPLETED).
	- LocalDateTime createdAt, LocalDateTime completedAt.
	- List<TodoEntry> children.
	- Logic: If a parent is marked COMPLETED, all children recursively become COMPLETED.

3. UI Components & Hierarchy
	- A. Main Window (JFrame)
		- Initialization: Load window bounds (width, height, x, y) from settings.cfg.
		- System Tray: On startup, if SystemTray is supported, minimize to tray instead of closing. Double-click tray icon to restore; Right-click for menu (Show JTodo, Exit).
		- Tabbed Pane: Use JTabbedPane. Each tab represents one .todo file.
		- Tabs must have a close "X" button and show the absolute file path on hover.
		- Status Bar: A bottom panel showing: Total: [count] | Done: [count] | In-Progress: [count] | Pending: [count].

	B. The Todo List (JTree or Custom List)
		- Rendering: Use a hierarchical view. Each entry shows a checkbox, the text, and a background color based on priority:
			- High: Light Red | Medium: Light Orange | Low: Light Green | None: Default.
			- Completed entries revert to default background to reduce visual noise.
		- Sorting Logic:
			- Checked/Done entries must stay at the bottom of their respective groups.
			- Unchecked entries stay at the top.
			- This logic applies recursively to child nodes.

4. Interaction & UX
	- Editing: Double-click or F2 to edit entry text. Enter to save, Esc to cancel.
	- Keyboard Shortcuts: Alt + Up/Down: Move entry within its group (Checked/Unchecked).
	- Context Menus:
		- On Entry: Edit, Priority (Sub-menu), Tracking (Sub-menu for Status), Delete (with confirmation), Add Child.
		- On Empty Area: New Entry, Clean Done (Delete all completed), Expand All, Collapse All.

5. Persistence Logic
	- Auto-Save: Every time a property changes (checkbox, text, priority), the specific .todo file must be serialized to XML in the background.
	- settings.cfg: Save a list of open file paths on exit. On startup, automatically re-open these tabs.

6. Implementation Requirements (The "How")
	- Provide a clear project structure.
	- Implement a FileHandler class for XML serialization using javax.xml.parsers or JAXB (if available in your standard library config).
	- Implement a SettingsManager to handle settings.cfg.
	- Ensure the CustomTreeCellRenderer handles the priority background colors and checkbox states correctly.
	- Include the logic for the "tri-state" checkbox appearance (Pending = empty, In-Progress = partial/dash, Completed = checked).

Do not write any code yet. Let’s first agree on the technical requirements, file structure, dependencies, etc.