

This tutorial will guide you through the process of building an appointments scheduling chatbot. Modern AI models are capable of much more than providing simple responses, offering advanced capabilities for dynamic interactions. The example used in this tutorial is available for download from our examples page. Later in this tutorial, we will present other ideas to further enhance your chatbot’s functionality.
1. The Appointments Scheduling Chatbot Example
Let’s dive into the technical details of our appointments scheduling chatbot. We’ll explore its structure in three key parts: the data model, the static chat flow, and the advanced scripting that brings it all to life.
First, download the example archive appointments-scheduler.zip which contains the following compressed files:
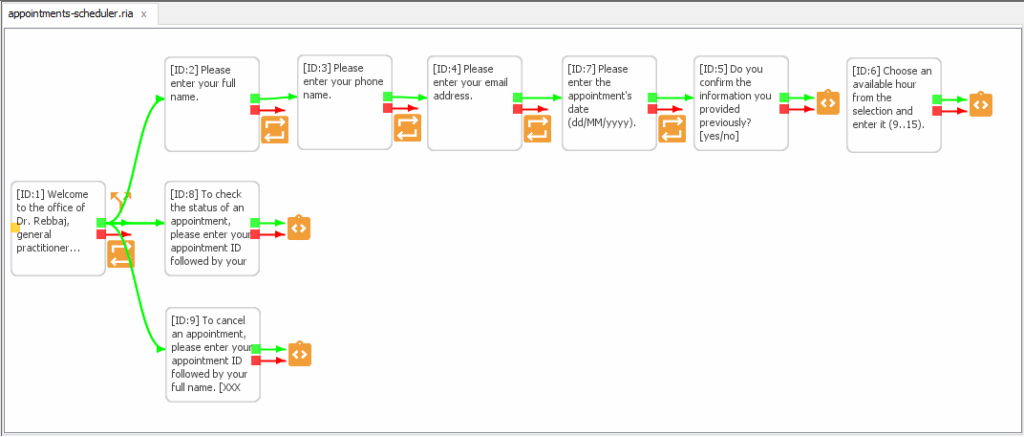
- appointments-scheduler.ria: This is the main chat flow RIA file for your chat server.
- appointments.db: An SQLite database where all appointments data is stored.
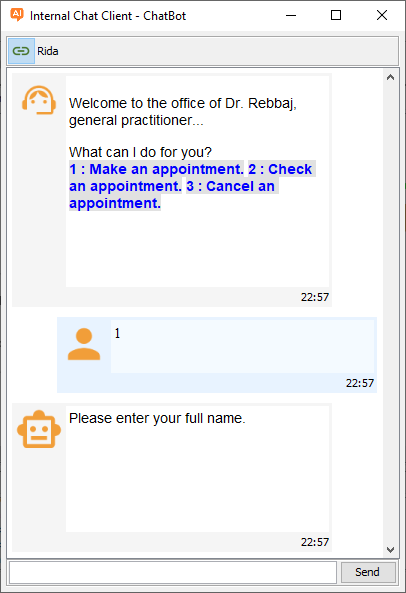
Once connected to a server, the chatbot greets users and offers three core actions:
- Make an Appointment
This flow begins by collecting the user’s full name, phone number, and email. Next, the system validates this information to prevent spam. Then, it asks for the desired appointment date and confirms the details. Finally, the chatbot displays available time slots for that date. After the user selects an hour, it saves the complete record to the database and provides a unique scheduling ID for future reference. If anything fails, the user sees a clear error message. - Check an Appointment
Users can easily verify their existing appointments. To do this, they select this option and provide their appointment ID and full name. The chatbot then searches the database for a match. If found, it confirms the appointment with the date and time. Otherwise, it displays a helpful error message. - Cancel an Appointment
This function allows users to free up a scheduled time. The chatbot requests the appointment ID and the user’s full name to locate the correct record. After verification, it deletes the appointment from the database, making that time slot available again. An error message appears if the process encounters any issues.
1.1. Data Model
For simplicity and educational purposes, the appointments.db SQLite database structure is designed to be very easy to manage. It contains only one table with the strict minimum required to store appointment scheduling records. Here is the appointments table structure:
| Field name | Field attributes |
| id | integer not null primary key unique |
date_creation | integer not null |
name | text not null |
phone | text not null |
email | text not null |
day (unique) | integer not null |
hour (unique) | integer not null |
msg | text not null |
confirmed | integer not null |
1.2. Static Chat Flow
At the moment, the appointments scheduler chatbot is designed as a static chat flow to facilitate study. We have made it work, and in the next section, we will discuss it in detail to make it better.
1.2.1. Entry Point
In your chat flow editor, you can easily identify the entry node by its distinctive orange dot on the left side.
When the chat server runs, this entry node performs two key actions: It sends a greeting message to the user then displays three clickable actions.
For ease of use, each action has a shortcut number. Therefore, users can either click the link or simply type the number to proceed.
This node uses a matching_list condition to validate the user’s response. Each item in this list pairs a potential user response with the corresponding next node ID. For a deeper dive into this feature, please consult the Chat4Us-Creator User Guide.
Pro Tip: To follow along, keep the appointments-scheduler.ria file open in the editor and double-click each node we talk about to view its details in the node editor dialog.
1.2.2. Make An Appointment
Our appointment chat flow starts by gathering essential user data: full name, phone number, email address, and desired date.
To manage user data, the chat server uses the variable:user_value success action. This key feature saves all data directly into the chat session’s memory. As a result, the information remains available for the entire process—from validation until the chat session termination.
We validate each piece of data immediately upon entry:
- Full Name: text:any
- Phone Number: number:any
- Email Address: text:email
- Appointment Date: date:dd/MM/yyyy
Important Note: The next steps rely heavily on JavaScript scripting. Therefore, if you haven’t already, please review the Chat4Us-Creator’s scripting section. This will help you understand how the upcoming nodes validate data, check availability, and save the appointment.
After the user’s date is received and validated, the next node triggers a script. This script checks the schedule and displays a list of available hours. Available slots are conveniently shown in green.
Bellow is the script that handles availability:
// response global variable contains remote user response.
var message; // message to send back to remote user.
function main() {
	if(response.toLowerCase() != "yes") { // Expected user response
		message = "Please start a new chat to try again.";
		return -1; // End chat
	}
	message = "For the day " + appdate + ", here is the availability :";
	let dbf = "./chatbots/appointments.db";
	let q = "SELECT hour FROM appointments WHERE day=?;";
	let [day, month, year] = appdate.split('/').map(Number);
	let date = Math.floor(new Date(year, month - 1, day));
	let args = [date];
	let data = ScriptEx.sqlQuery(dbf, q, args);
	let hours = data.flat();

	// Check for availability
	let b;
	let dispo = false;
	for(let i = 9; i <= 15; i++) {
		b = hours.includes(i);
		dispo ||= !b;
		message += "<br/><span style='color:" + (b ? "red" : "green") + ";'>" + i + "H : " + (b ? "is taken" : "is available") + "</span>";
	}
	if(dispo) {
		return 6; // Move to node id=6
	} else return 5; // Repeat the question to let user choose another hour
}
main();
The last node in the Make An Appointment chat flow section, checks the hour number received from the remote user against available ones on the chosen day and add an appointment scheduling record in the appointments.db database using the following script:
// response global variable contains remote user response.
var message = ""; // message to send back to remote user.
function main() {
	let dbf = "./chatbots/appointments.db";
	let q = "SELECT hour FROM appointments WHERE day=?;";
	let [day, month, year] = appdate.split('/').map(Number);
	let date = Math.floor(new Date(year, month - 1, day));
	let args = [date];
	let data = ScriptEx.sqlQuery(dbf, q, args);
	let hours = data.flat();
	let n = Number(response);
	if((n >= 9 && n <= 15) && !hours.includes(n)) {
		let qi = "INSERT INTO appointments (date_creation, name, phone, email, day, hour, msg, confirmed) VALUES(?, ?, ?, ?, ?, ?, '', 0);";
		let args = [Math.floor(new Date()), name, phone, email, date, response];
		let id = ScriptEx.sqlInsert(dbf, qi, args);
		if(id > 0) {
			message = "Your appointment successfully registred. ID=<b>" + id + "</b><br/>You will be contacted via email or phone to confirm your appointment. Please remain available by phone and check your email to confirm. Any unconfirmed appointment will be automatically deleted after 48 hours.";
			return -1; // End the chat
		} else {
			message = id + " > Error saving appointment!<br/>Please try again later or try booking an appointment by phone.";
			return -1; // End the chat
		}
	} else {
		message = "The hour " + response + " is incorrect or already taken. Please enter a time from the selection shown previously.";
		return 6; // Restart current node to let user choose another hour
	}
}
main();
1.2.3. Check An Appointment
This chat flow section has just one node that asks the remote user for their appointment scheduling ID, followed by their full name. It then runs a script to load the record based on the provided ID and name, showing either a confirmation message or an error message if no matching record is found.
// response global variable contains remote user response.
var message; // message to send back to remote user.
function main() {
	let dbf = "./chatbots/appointments.db";
	let q = "SELECT day, hour, confirmed FROM appointments WHERE id=? AND name=?;";
	let parts = response.split(" ");
	let id = Number(parts[0]);
	let nom = parts.slice(1).join(" ");
	let args = [id, nom];
	let data = ScriptEx.sqlQuery(dbf, q, args);
	data = data.flat();
	let date = new Date(Number(data[0]));
	if(data.length == 3) {
		message = "An appointment " + (data[2]==0 ? "<b>Not</b> confirmed" : "<b>Confirmed</b>") + " is programmed for " + date.toLocaleDateString("en-EN") + " at " + data[1] + " hour.";
		return -1; // End the chat
	} else {
		message = "No appointments found with the provided id and name.<br/>Please try again, paying attention to the data provided.";
		return -1; // End the chat
	}
}
main();
1.2.4. Cancel An Appointment
This part of the chat flow has a single node that requires an appointment ID and a full name to load an existing appointment record, delete it from the appointments table, and make it available again for others. This task is handled by the following script:
// response global variable contains remote user response.
var message; // message to send back to remote user.
function main() {
	let dbf = "./chatbots/appointments.db";
	let q = "DELETE FROM appointments WHERE id=? AND name=?;";
	let parts = response.split(" ");
	let id = Number(parts[0]);
	let nom = parts.slice(1).join(" ");
	let args = [id, nom];
	let n = ScriptEx.sqlUpdate(dbf, q, args);
	if(n > 0) {
		message = "Your appointment has been canceled.";
		return -1; // End the chat
	} else {
		message = "No appointments found with the provided id and name.<br/>Please try again, paying attention to the data provided.";
		return -1; // End the chat
	}
}
main();
1.3. Hosting The Chatbot

To host the RIA file on a chat server, go to the Chatbots tab in the left pane of the main window. Right-click in an empty space to open the popup menu and select Add… In the New Chat Server dialog, set the Host field to 0.0.0.0 and the Port to 8443, or any preferred value. Set AI Group to N/A, click the […] button, and choose appointments-scheduler.ria from the file open dialog. Optionally, add a description, then click Add to create the chat server. Finally, right-click the new chat server, select Activate, and enter the authentication password—default is a123456/* unless it’s been changed.
1.4. Accessing The Chatbot
Your appointments scheduling chatbot is now built! The next crucial step is to test it thoroughly before integrating it into your website or app. Fortunately, the process is straightforward using the dedicated software client.
Download the Client
First, grab the chat4us-software-client.zip file from the official downloads page. Then, extract the archive. If you don’t need the source code, you can simply extract the jar compressed folder then run chat4us-client.jar.
Important: You must register the client with your chat server before it can connect to the chat server.
Register the Client in Chat4Us-Creator
- Navigate to the Clients tab in the main window’s left pane.
- Right-click an empty area and select Add… from the popup menu.
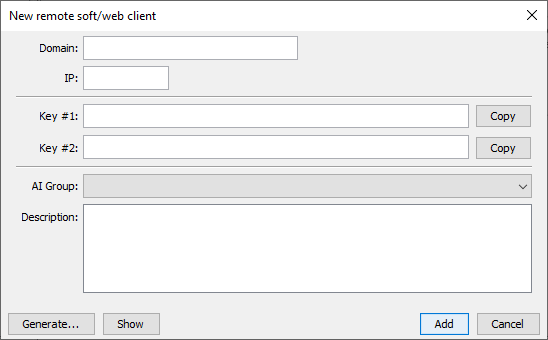
- In the New Remote Client dialog, follow these steps:
- Set both the Domain and IP fields to 127.0.0.1 (if testing locally).
- Enter or generate random credentials for Key #1 and Key #2. Save these immediately, as you cannot retrieve them later.
- Set the AI Group field to N/A.
- Finally, add an optional description and click the Add button to register.
Pro Tip: AI Groups are used to keep chat servers and their connected clients and agents separate. In simple terms, a client belonging to one AI Group can’t access a chat server from another AI Group.
Step 3: Connect and Test Your Chatbot

- Run the chat4us-client.jar
- Click the Connect button to open the server connection dialog.
- Enter the following connection details:
- Server IP: 127.0.0.1
- Port: 8443
- Key #1 and Key #2: (The credentials you saved earlier)
- Click OK, and you’re connected! You should immediately receive the greeting message from your chatbot, ready for testing.
Good news for future testing! An upcoming release of Chat4Us-Creator will include an integrated, authentication-free chat client. This will allow new users to get started instantly and run quick tests without repeatedly filling out connection forms.
2. Extending The ChatBot
The chatbot, as shown before, implements basic core features of an appointments scheduling software. In this section, we will discuss ideas and suggestions everyone can implement depending on our specific use case. Extending the chatbot may require knowledge that is not fully covered in this tutorial this is why it is highly advisable to read the Chat4Us-Creator user guide to learn more about each feature discussed here.
2.1. Adding features
To keep our tutorial chatbot simple and educational, we intentionally omitted some advanced features. However, you can easily extend its functionality to meet your specific needs. Here are three enhancements you can implement:
Include an Appointment Message:
Start by creating a new node that asks users to include a message with their booking. For example, a patient could describe their symptoms to help a doctor prepare for the visit. This simple addition makes your chatbot significantly more helpful and context-aware.
Implement a Postponement Feature
You can empower users to reschedule their appointments. To do this, create a new chat flow section for postponing to a future date. We recommend studying the existing scripts in the project. Use them as inspiration to write a new script that:
- Finds the existing appointment.
- Checks availability for the new date.
- Deletes the original booking.
- Creates a fresh appointment.
Enable Smart AI & Agent Handoffs
When you integrate an AI model or the messenger app, you can add intelligent monitoring. A global script can watch the conversation for specific keywords.
For phrases like “make an appointment” or “schedule and appointment”: The script can switch back to the appointment booking flow.
For requests like “talk to a human” or “speak to an agent”: The script can instantly transfer the chat to a human agent via the messenger app.
This chatbot is a foundation. You have the power to expand and customize it with any feature your business requires, creating a truly tailored user experience.
2.2. Making it Multi-language
In our globalized world, a multi-language chatbot is essential. Designing your chatbot to support at least three major spoken languages is a strategic advantage.
You can easily implement this by adding a new entry node. This node lets users select their preferred language before proceeding to the main action menu. Right click on a node then select Set as entry from the popup menu.
Pro Tip: Use the matching_values condition for this step. Set the success action to user_locale:user_value. This will automatically switch the chatbot’s language as soon as the user makes a valid selection.
Example matching_values condition:
[ ‘1’, ‘EN’ ] [ ‘2’, ‘AR’ ] [ ‘English’, ‘EN’ ] [ ‘Arabic’, ‘AR’ ]
For a deeper dive, please refer to the official Chat4Us-Creator documentation.
Step-by-Step: Convert Your Chatbot to Multi-Language
Once your base chatbot is fully tested, follow these steps to transform it:
First: Duplicate and Rename Files
- Rename your original RIA file to include a language code (e.g., appointments-scheduler-en.ria).
- Create a copy for each new language. For an Arabic version, name it appointments-scheduler-ar.ria.
Next: Translate the Chat Flow
- Open each appointments-scheduler-XX.ria file in the graphic editor.
- Double-click on each node to translate the Message, Success Message, Error Message fields and Script messages.
Finally: Configure Locale Settings
- For each file, right-click on an empty area and select Settings.
- In the Options tab, set the Locale field to the correct language code (e.g., AR, EN, FR).
- Navigate to the Params tab. Here, you must link all language versions by adding a parameter for each:
- Key: locale_XX (e.g., locale_AR)
- Value: appointments-scheduler-XX.ria (e.g., appointments-scheduler-ar.ria)
The Final Result
By completing these steps, you will have a dynamic chatbot that automatically switches to the user’s chosen language. Furthermore, this configuration also defines the language for any integrated AI model, ensuring all generated responses are linguistically consistent.
2.3. Integrating an AI Model
Integrating a powerful AI model or Large Language Model (LLM) can supercharge your appointment scheduling chatbot. For instance, it can automatically answer user questions about your business, your team, and your services, providing a rich, informative experience.
Configure the AI Service in Chat Settings
Chat4Us-Creator seamlessly connects to both local and cloud-based AI models like OpenAI, DeepSeek, and Groq.
- Right-click on an empty area in your chat flow and select Settings.
- Navigate to the Params tab.
- Add the following key parameters to the table. Replace xxx_ with your provider’s prefix (see below).
- xxx_model: The specific AI model name (e.g., gpt-4).
- xxx_max_tokens: The maximum length for AI responses.
- xxx_temperature: Controls response randomness (adjust for creativity).
- xxx_api_key: Your API key for cloud-based services.
You must use the correct prefix for your AI provider:
- Local Models: gpt4all_ or ollama_ (No API key needed)
- Cloud Services: chatgpt_, deepseek_, or groq_ (API key required)
Add an AI Choice to Your Chat Flow
Select your entry node and press F2 to edit it. Add a new menu option like: 4 : Chat with an AI-assistant. Next, edit the matching_list condition. Add these two items to route the user to an AI-driven conversation:
[ ‘Chat with an AI-assistant’, -3 ] [ ‘4’, -3 ]
The value -3 instructs the chat server to switch to an AI-driven conversation.
Finalize Server Configuration
The last step is to edit your chat server settings to include the API URL for your chosen AI service in the AI Servers list.
For a complete, detailed guide, please refer to our dedicated AI integration documentation.
2.4. Connecting A Human Agent
Even the best chatbots sometimes encounter unique requests. That’s why the optimal solution is to seamlessly connect the user to a human agent. With Chat4Us-Creator, you can easily transfer the chat flow using the specialized Chat4Us-Agent messenger app.
Here’s how the handoff process works:
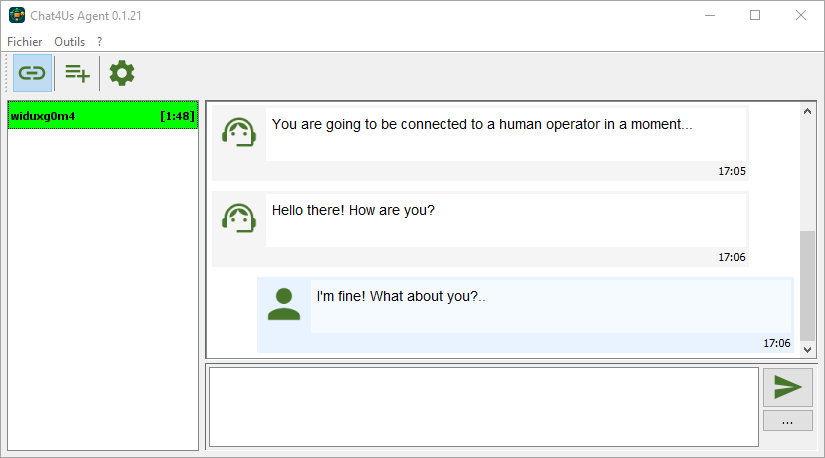
When a chat switches to a human-driven conversation, the server automatically finds an available Chat4Us-Agent messenger to connect with the user.
The messenger app gets the request, adds the new chat to the agent’s list and sends a system notification or sound alert. The human agent can then open the chat session, view the full conversation history between the chatbot and the remote user in order to handle any tricky issues the chatbot couldn’t resolve.
2.4.1. Using Chat4Us-Agent messenger
Let’s set up the Chat4Us-Agent messenger to handle live user connections.
Download & Install the Agent
- Navigate to the downloads page and get chat4us-agent-v0.1.25.zip.
- Extract the ZIP file to a folder on your computer.
- Important Prerequisite: Ensure you have Java JRE 21 installed.
- Run the chat4us-agent.jar file. You may need to grant it appropriate permissions.
- For first-time setup, use the default password a123456/* to authenticate. Don’t forget to either import a certificate or generate a new self-signed one.
Configure the Server Settings
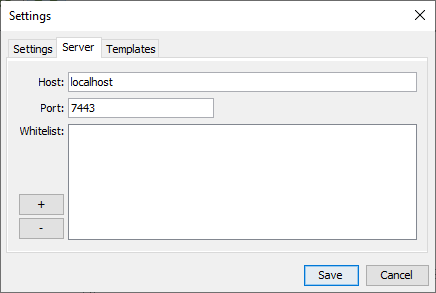
- Open the Settings dialog and select the Server tab.
- Set the Host field to 0.0.0.0.
- Set the Port field to 7443 (or your preferred port number).
- You must add the IP address of your Chat4Us-Creator machine to the whitelist.
- Click Save and restart the messenger app.
Pro Tip: For more detailed instructions, always refer to the official Chat4Us-Agent user guide.
Register the Agent in Chat4Us-Creator
- Switch back to Chat4Us-Creator.
- Select the Agents tab on the left side of the main window.
- Right-click on an empty area and choose Add… from the popup menu.
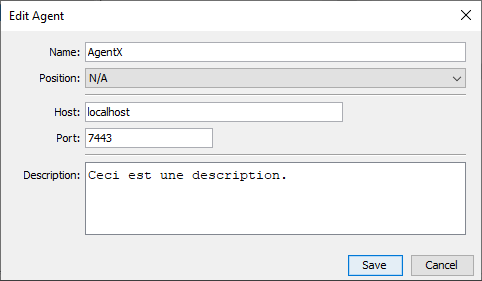
- In the New Agent dialog fill the fields:
- Name: Give your agent a descriptive name.
- Position & AI Group: Set both to N/A.
- Host: Enter the IP address where Chat4Us-Agent is running.
- Port: Enter the port you defined earlier (e.g., 7443).
- Finally, add an optional description and click Add to register.
Congratulations! Your chat server is now aware of the messenger app and can route chats to it.
Key Reminder: Remote users will be disconnected if the Chat4Us-Agent is not running or is offline.
2.5. Implementing live database update
For security reasons, chatbot scripts cannot access files outside the chatbot subfolder. We may need to automate sending email messages to remote users to confirm appointment scheduling and update appointment records when the confirmation is validated. For such complex projects, we may need to develop a script or software that will serve as an intermediate between the website and the chatbot.