
You designed your chatbot using Chat4Us-Creator. Now it’s time to integrate it into your own website or app, allowing users to interact with the chatbot for customer service or any other purpose. If you navigate to downloads page, you will find two sample projects ready for download.
In this tutorial, we will cover client-server communication mechanisms that are project-specific because the rest of the source code is UI management that any regular developer must master by default.
1. Registering remote clients
Before diving into the main topic, it’s important to understand how remote clients are registered in Chat4US-Creator so chatbot servers can identify them and grant access to chat sessions. The Chat4US-Creator administrator needs to provide the following information for a remote client:
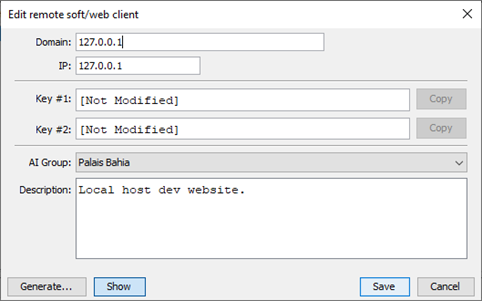
- Select the Client tab that is located in the left panel of the main window.
- Right-click on an empty area, then select “Add…” from the popup menu or choose Clients > Add…, the New Remote Soft/Web Client dialog will appear.
- Add the domain name and IP address where the remote client will make requests from.
- Enter a credential key (Key1 and Key2) or generate random ones; save them as you won’t have access to, when you validate the client.
- Select the AI group the client will belong to. A client has restricted access to chatbots belonging to the same AI grouping.
- Enter a description, if needed.
- Validate by pressing Enter or click the Save button to register the new client.
2. ChatBot Server API
All client-server data exchanges are protected through the use of SSL certificates. While Chat4Us-Creator supports the implementation of self-signed certificates, it is strongly advised against using them in production environments, particularly when chatbot servers are exposed to internet connections.
2.1. Data structure
The client sends requests using the POST method and application/x-www-form-urlencoded as content type. The chatbot server allways responds with JSON content type that has the following structure:
- STATUS: Response status, either OK or ERROR.
- TOKEN: Exists only on a login response. The token should be part of any further queries.
- MESSAGES: Array of incoming messages from the chatbot server. Usually with a length of 1.
- CHAT_ENDED: True when the chat session is ended and the client is disconnected.
- LOCALE: Current chat session locale. ID of current language (AR, EN, FR, etc.).
- CHATBOT_WAITING: True if the chatbot is waiting to resume the chat session after switching CHAT_STATE.
- CHAT_STATE: Current chat session state. Could be one of the following values:
- CHATBOT: Currently chatting with a static Q&A chat flow.
- AIMODEL: The chat session is animated by a Large Language Model.
- AGENT: The chat is animated by a human via the messenger app Chat4Us-Agent.
When logged in, if the chatbot server encounters an error or declines to process a client query for any reason, a JSON response similar to the one below is returned:{
"STATUS" : "ERROR",
"ERROR_MESSAGE" : "Error message description.",
"ERROR_CODE" : ###
}
2.2. Login query
To log in and access a chatbot server, the client should send a POST query to https://chatbot_host:port/login with the following data:
- key1: Client credential first key.
- key2: Client credential second key.
The chatbot server should respond with a status OK and an access TOKEN that must be included in every further query:{
"STATUS" : "OK",
"TOKEN" : "Random Token String"
}
2.3. Logout query
To log out, a POST query to https://chatbot_host:port/logout with the login token as data should be sent to the chatbot server. A status OK is then returned:{
"STATUS" : "OK"
}
2.4. LetsChat query
The LetsChat query starts a new chat session and returns the chat flow node entry’s message. The client sends a POST request to https://chatbot_host:port/letschat with the login token and the user_id as data, telling the chatbot server to start a chat session. The following is an example of the expected JSON response:
{
"CHATBOT_MESSAGE" : ["Entry node message."],
"STATUS" : "OK",
"LOCALE" : "EN",
"CHAT_STATE" : "CHATBOT",
"CHAT_ENDED" : false
}
2.5. Message query
The message query is used to deliver a remote user’s input to a chatbot server. A POST request is sent to https://chatbot_host:port/message with the user’s user_id and message, along with the login token as data. The JSON response structure is similar to LetsChat query:
{
"CHATBOT_MESSAGE" : ["Response message."],
"STATUS" : "OK",
"LOCALE" : "EN",
"CHAT_STATE" : "CHATBOT",
"CHAT_ENDED" : false
}
2.6. Special cases to handle
We have seen regular chatbot server responses that a soft/web client will handle from the start of a successful login to a logout, but there are some special cases a client should be aware of and handle to deliver a better user experience.
2.6.1. When CHAT_ENDED is True
When the CHAT_ENDED field is set to True in a JSON response, it means the client should let the remote user know the chat session has ended, and the chatbot server won’t accept any more queries for that session. By then, the server has already archived the session and freed up any related system resources. Usually, chat flow logic decides when end a session, but sometimes the server might end one due to an unexpected error. That’s why it’s a good idea to check Chat4Us-Creator’s log files for possible errors or bugs in the chat flow.
2.6.2. When CHATBOT_WAITING is True
The CHATBOT_WAITING field will appear in a JSON response only when the CHAT_STATE changes value. When a chat flow logic switches state from CHATBOT to AIMODEL, the chatbot server returns the message(s) from the node that triggered the switch; then set CHATBOT_WAITING to True to inform the client logic to send an automatic/hidden query to let the connected LLM generate a first response to the remote user. The client should send any message query for this purpose – as indicated in the two sample projects provided on the download page, which include “…”.
The client should make adjustments to the UI in order for users to have a clear understanding of who they are interacting with.
2.6.3. When LOCALE changes
The LOCALE field is set to the RIA file’s main locale value and may change value when running multi-language chat flows. The client should monitor this field and make UI adjustments when the value changes especially when set from LTR to RTL languages.
2.6.4. Messages format
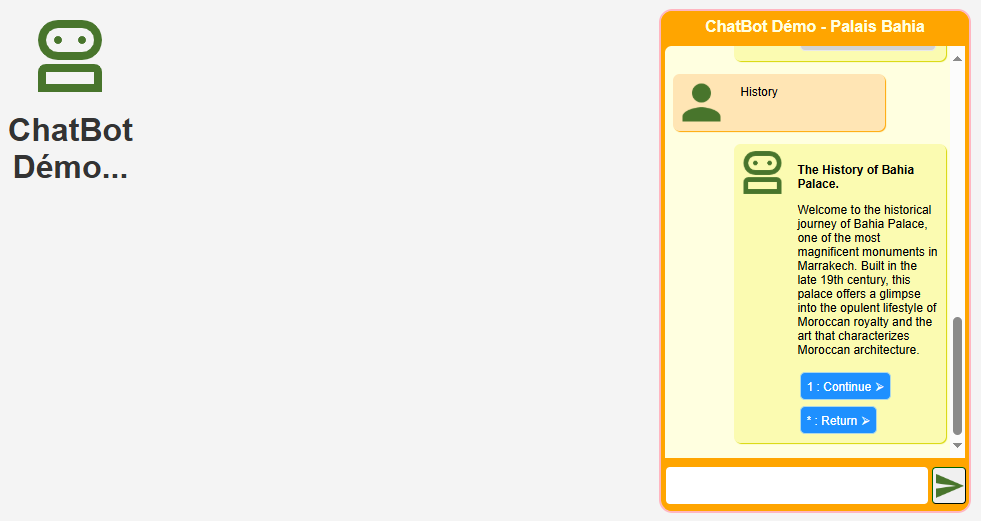
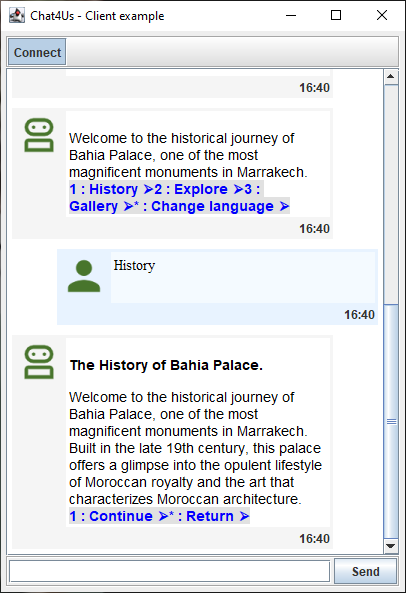
In the Bahia Palace virtual assistant example, chat messages are sent to remote users in HTML format, each ending with buttons. This makes it easy to interact with the chat flow by simply clicking a button, offering a great opportunity to enhance your own implementation by applying this approach on a larger scale.
3. Sample projects
Now that we have a clear understanding of the chatbot servers API and client-server’s data exchange mechanisms, it’s essential to delve into the sample projects source codes for an even more in-depth understanding. This will serve as a foundation for developing more sophisticated chatbot clients capable of handling complex interactions with users. Furthermore, analyzing the code used within these samples can provide valuable insights into how different components interact and work together seamlessly.
3.1. Software client
An Eclipse IDE Java Swing project. A cross-platform messaging app, developed in a comprehensive manner to let developers understand the mechanisms to use for communicating with chatbot servers to enable users to interact with virtual assistants.
To get a better understanding, start by reviewing ServerConnector.java as it aligns with the concepts covered in this tutorial. The remainder of the project focuses on UI management, utilizing the ServerConnector class to interact with chat bot servers. Notably, the source code is highly readable and adaptable for reuse across platforms like Android Studio, requiring only minor modifications for compatibility.
3.2. Web client
A web project developed using easy to understand HTML, CSS, JavaScript and PHP source code. It is a demo website implementing a chat IFrame that allows users to interact with virtual assistants inside a web browser. This feature is very useful for websites owners who need to integrate a chatbot for any purpose.
To follow along, navigate to webchatclt/WebChatClt/bot/index.php and webchatclt/WebChatClt/js/wcc_main.js in the sample project where the concepts are put into practice. The rest of the sample project focuses on general web design tasks, with Apache or Nginx required to be installed and running to serve the project locally on your computer.
Conclusion
By reading this tutorial, you may acquire knowledge that leads you to develop your own chatbot clients. In fact, the ability to design and create sophisticated conversational interfaces can be a game-changer for individuals and organizations alike. By understanding how Chat4Us components work together seamlessly, you’ll unlock new possibilities for creating engaging virtual interactions. If you haven’t already, check out the following guides to better understand how these components work together seamlessly to create the most enjoyable virtual chat experience.
Get Started
ChatBots Examples
Chat4Us-Creator User Guide
Chat4Us-Agent User Guide