
Table of Contents
Questions and Answers chat flows in the Chat4Us-Creator project are designed using an integrated graphic – diagram like – editor. It is created as simple yet capable of designing robust chat flows that can at any moment switch either to an AI-driven conversation or to a human operator when needed via a messenger app.
You can easily design simple QA chat flows by adding nodes to the editor, connecting them and defining the flow validation logic. Basically, each validation produces a success or error connection to another node; however, you can define more complex validations for greater control. JavaScript scripting is often used for edge cases such as local or remote data management in addition to discussion moderation and monitoring.
1. Graphic Chat Flow
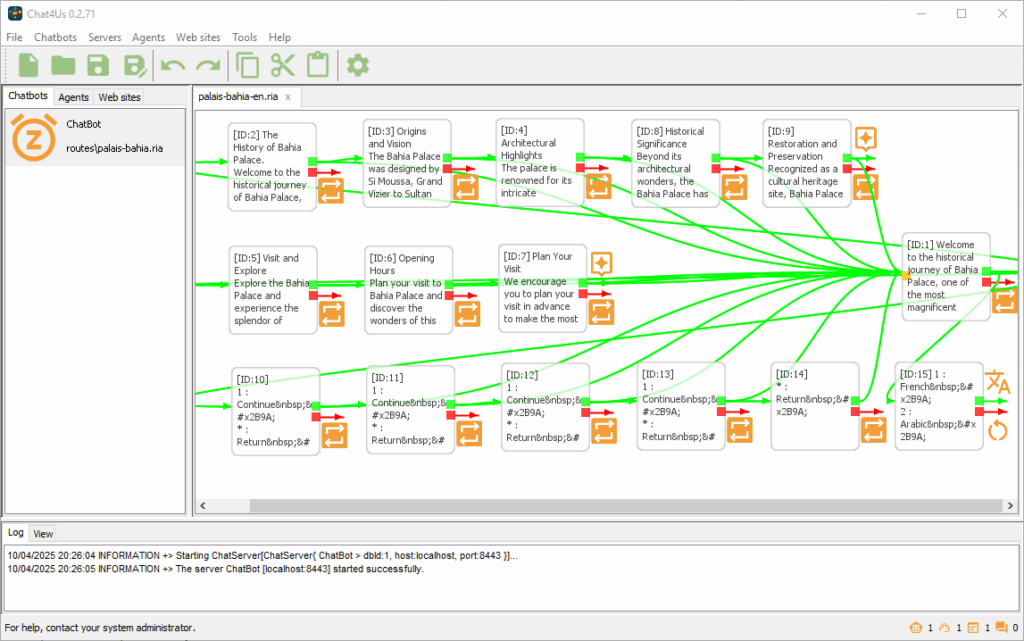
As stated before, the graphical nodes editor is a visual designer of chat flows. When saved, a chat flow is written into an RIA file which can be loaded by a chatbot server and served to a remote user as a discussion. A chat flow is a set of nodes that can be a question, a call-to-action, information request, etc. When a remote user responds with a message, this one is directed to a validation process which decides the next node: the next question or request. This process is repeated until the remote user stops responding or the chat flow determines it has reached its end.
1.1. A Node
A node is a single part of the chat flow that holds a message and defines the validation process. The message represents the text to send to the remote user when the chat flow progresses to the next node. The validation process involves a set of conditions that validate the remote user’s response, determining which path forward for the conversation. The validation process is covered later in the guide.
You can add a new node to the graphic editor in two ways: by pressing the INSERT key from the keyboard or by right-clicking on an empty area and selecting Add… from the popup menu. You can remove a selected node by pressing the DELETE key from the keyboard, or edit it by pressing F2.
1.2. Connecting nodes
You can connect nodes using your mouse. For successful validation connections, click on the green dot inside the node you want to connect, hold left mouse button and drag the green arrow until it enters the other node to be connected; then release the mouse button. A green arc is drawn between the two connected nodes. Do the same for error nvalidation connections by pressing the left mouse button on the red dot and releasing the key when the cursor is inside the other node. A red arc is then drawn between the two connected nodes.
For advanced validation, you will use the Node Editor Dialog that is covered later in this guide.
1.3. Defining the chat flow entry
Each chat flow has a node defined as an entry, which is the first one to process when starting a discussion with a remote user. To set a node as a chat flow entry, right-click on it and then select Set as entry from the popup menu. An orange dot will appear on the left side of the entry node to differentiate it from other ones on the graphic editor.
1.4. Chatbots menu
The Chatbot’s menu holds some useful commands that are applied to the graphic editor.
- New: Creates a new empty chat flow in a new graphic editor.
- Open: Loads an existing RIA file into the graphic editor.
- Recently opened…: Shows a list of recently opened RIA files.
- Add: Adds a new node into the selected graphic editor.
- Paste: Pastes a node already copied to system clipboard.
- Delete all: Removes all nodes from the selected graphic editor.
- Settings…: Shows the chatbot flow settings dialog.
1.5. Toolbar
The main toolbar holds most used graphic editor’s commands. Pay attention to buttons tooltips which show respected shortcut keys for each one.
- New: Creates a new empty chat flow in a new graphic editor.
- Open: Loads an existing RIA file into the graphic editor.
- Save: Saves selected graphic editor’s chat flow into a RIA file.
- Save as: Saves selected graphic editor’s chat flow into another RIA file.
- Undo: Undoes last action made to the graphic editor.
- Redo: Reapplies last undone action.
- Copy: Copies the selected node into system clipboard.
- Cut: Cuts the selected node into system clipboard.
- Paste: Pastes a node from system clipboard into the graphic editor.
- Settings: Shows app settings dialog.
1.6. Shortcut keys
The following shortcut keys are only available inside a graphic editor.
- Ctrl+S: Saves current chat flow into a RIA file.
- Ctrl+Z: Undoes the last action.
- Ctrl+Y: Reapplies the last undone action.
- Ctrl+X: Cuts the selected node into system clipboard.
- Ctrl+C: Copies the selected node into system clipboard.
- Ctrl+V: Pastes the copied node from system clipboard into the graphic editor.
- Ins: Inserts a new node.
- Del: Deletes the selected node.
- F2: Edit the selected node using the node’s editor dialog.
2. Node Editor Dialog
To open the Node Editor dialog, double-click on a node or select one and press F2. It holds all the selected node’s properties to define its behavior inside a chat flow when loaded by a chat bot server. Click on the Save button to apply changes to the selected nodes.
2.1. Message Field
Defines the message to send to a remote user when the chat flow reaches a node. A common practice is to use special markup either HTML or another format, so that the remote user can see a rich text format during the conversation. Also, as implemented in some chat bot examples available for download, HTML buttons that users can click on to respond easily to chat bots messages. The agreed markup format should be implemented by the remote client software; it is then used by the integrated chat bot system exchanges.
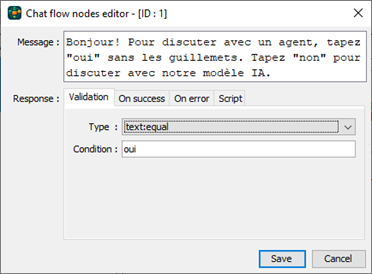
2.2. Validation tab
The validation tab contains two fields that define the type and condition to validate user responses. These fields allow users to configure complex validation rules, such as matching specific patterns or ranges of acceptable values for input data. When a user response is validated, the on success action is performed. On error action is performed when the validation process failes. Here is a list of possible validation types with examples:
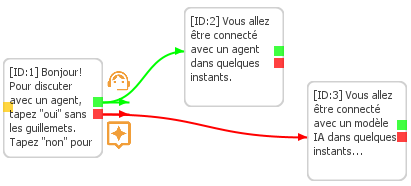
- nop: No Operation, which ignores validation and moves directly to the connected – green arrow – node. Example: Node1 is connected to Node2; Node2 is connected to Node3, all have ‘nop’ as their validation type and are connected using success/green arrows. When the chat flow reaches Node1, the chat bot server sends Node1.Message to the remote user, then moves directly to Node2, sends Node2.Message, and directly moves to Node3, sending Node3.Message. The remote user will receive 3 successive messages from the chat bot server.
- text:any: Expect any text response from a remote user, and no condition is applied against it. This means that on success tab action action is automatically performed. On error condition is never performed here.
- text:equal: Expect any text response from a remote user and compare it to the condition field. Text comparaison here is case insensitive.
- text:in_list: Checks whether the list defined in the condition field contains user response. The list format is similar to CSV format, meaning it’s ‘;’ separated list. Example: value1;value2;value3
- text:email: Checks whether user response is a valid email.
- number:any: Accept any numeric user response.
- number:equal: User response must be a number and equals the condition field for a success validation.
- number:interval: User response must be a number in the range defined by the condition field. Range format is ‘#…#’, example: 0…9, -9…9, 13…99.
- matching_list: The matching list is a complex validation rule used when the chat flow offers many possible choices to remote users. The matching-list format is defined as [‘Text’, node_id], where ‘Text’ is the expected user response and node_id is the number ID of the node to move to on successful validation. On error action is performed when validation failes. Example: [‘1’,3][‘Continue’,3][‘*’,1][‘Back’,1]
- boolean:any: Any boolean value. Currently, remote users can response by ‘yes’ or ‘no’ using the following languages: AR, DE, EN, ES, FR, IT. Dev. Note: This has to be defined by the chat flow params for multi-language chat bots.
- matching_values: Is a special validation method used to add an extra layer of clarification between user responses and values expected by the chatbot server. This is especially useful when implementing multi-language chat bots. In this specific case, we ask remote users to choose from a list of available languages such as Arabic, English and French. We then translate the user’s response into technical locales codes like AR, EN, FR. To change the chat flow language, set the success action field to ‘user_locale:user_value’ on the On success tab. For more information, check out the downloadable multi-language example guide.
- script: When a special case cannot be handled using regular validation or even complex validation rules, the scripting solution enters into action. In that scenario we can write a JavaScript that handles more complex and edge cases. Chatbot scripting will be covered briefly in this guide. You can navigate to Chat4Us-Creator User Guide for more information.
2.3. On Success tab
hen a remote user response is validated, the action defined in this tab is performed. An action is divided into 3 parts:
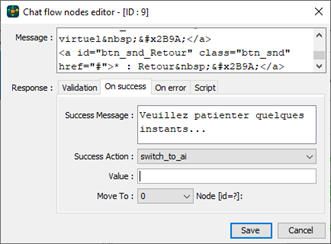
- Success message: The message to send to remote user as response for his/her input.
- Success action: Action to perform before moving to the node defined by the 3d part:
- nop: No Action or Do Nothing.
- user_locale:user_value: Inform the chatbot server to set the current locale/language to the result of matching_values based on the user’s response.
- variable:user_value: Affects user response to a variable. The variable is defined in the Value field. Please refer to Chat4Us-Creator User Guide for more information.
- variable:operation: Perform an arithmetic calculation to an existing variable using one the following operators:
- =+: var_name=+# where var_name is a variable name and # is the value to add to it.
- =-: var_name=-# where var_name is a variable name and # is the number to extract from it.
- =*: var_name=*# where var_name is a variable name and # represents the number to multiply the variable by.
- =/: var_name=/# where var_name is a variable name and # is the number to divide the variable by.
- repeat: Repeat or restart current node logic. This behaves like the chat flow just reached current node.
- switch_to_ai: Inform the chatbot server to switch current chat flow to an AI-driven conversation. Please refer to the Chat4Us-Creator User Guide for more information about how to connect a chat flow and a chatbot server to local/offline or remote Large Language Models.
- switch_to_agent: Inform the chatbot server to connect the chat flow to a human/agent operator via the messenger app. Please refer to the Chat4Us-Creator User Guide for more information about how to connect the Chat4Us-Agent messenger app when a human interaction is needed.
- restart: Inform the chat bot server to restart the entire chat flow and begin from the node marked as the chat flow entry point.
- end: Inform the chat bot server to end current chat and disconnect remote user.
- Move To: The id of the node to move to.
2.4. On Error tab
When a remote user response validation fails, the action defined in this tab is performed. The action defined for this tab is very similar to one on success except changing chat flow locale/language which is not supported when validation fails. An action is divided into 3 parts:
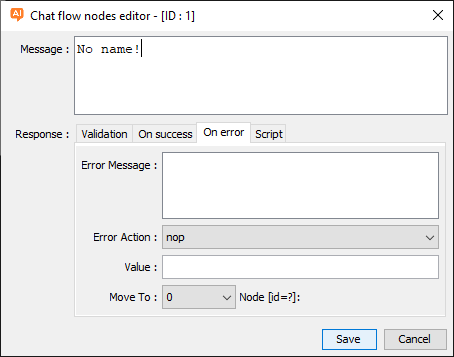
- Error message: The message to send to remote user as response for his/her input.
- Error action: Action to perform before moving to the node defined by the 3d part:
- nop: No Action or Do Nothing.
- variable:user_value: Affects user response to a variable. The variable is defined in the Value field. Please refer to Chat4Us-Creator User Guide for more information.
- variable:operation: Perform an arithmetic calculation to an existing variable using one the following operators:
- =+: var_name=+# where var_name is a variable name and # is the value to add to it.
- =-: var_name=-# where var_name is a variable name and # is the number to extract from it.
- =*: var_name=*# where var_name is a variable name and # represents the number to multiply the variable by.
- =/: var_name=/# where var_name is a variable name and # is the number to divide the variable by.
- repeat: Repeat or restart current node logic. This behaves like the chat flow just reached current node.
- switch_to_ai: Inform the chatbot server to switch current chat flow to an AI-driven conversation. Please refer to the Chat4Us-Creator User Guide for more information about how to connect a chat flow and a chatbot server to local/offline or remote Large Language Models.
- switch_to_agent: Inform the chatbot server to connect the chat flow to a human/agent operator via the messenger app. Please refer to the Chat4Us-Creator User Guide for more information about how to connect the Chat4Us-Agent messenger app when a human interaction is needed.
- restart: Inform the chat bot server to restart the entire chat flow and begin from the node marked as the chat flow entry point.
- end: Inform the chat bot server to end current chat and disconnect remote user.
- Move To: The id of the node to move to.
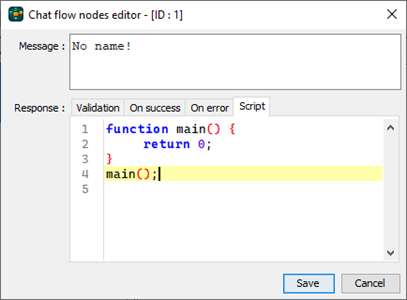
2.5. Script tab
Chatbot creators can leverage this tab to write custom JavaScript code, utilizing syntax highlighting and basic writing assistance. If a unique case cannot be addressed through regular or complex validation rules, scripting kicks in for more nuanced handling. This guide will touch on chatbot scripting briefly, but visitors are encouraged to visit Chat4Us-Creator User Guide for further details and additional documentation on this topic.
3. Chat bot Settings Dialog
Click on an empty area of the graphic editor, then choose Settings… from the popup menu to open the Chat bot settings dialog. There, you can define current chat flow global settings which determine the chat flow’s behavior when interacting with remote users.
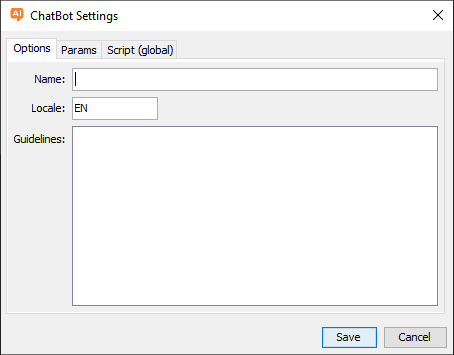
3.1. Options tab
First thing to define here is the chat bot name, which can identify the chat bot in log files, chats history, etc. Especially when Chat4Us-Creator app is running multiple chatbot servers.
Second, it’s essential to define the chatbot’s main locale, this information is useful when creating multi-language chat flows as it will be used during the locale changing validation process.
Additionally, defining Large Language Model guidelines is important, which are included in the model itself and should also dictate what the LLM respects when generating responses.
3.2. Params tab
Holds a list of key/value pair parameters that the chat bot server running this chat flow uses during chat sessions. When opening the chat bot settings dialog for the first time, a number of default parameters are added automatically to the table:
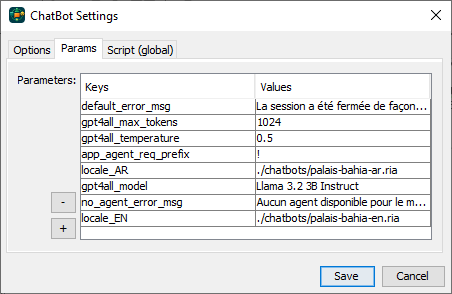
- default_error_msg: An error message to send to remote users when the chat bot server encounters an unhandled exception. This should be written in the main locale language.
- no_agent_error_msg: An error message to send to a remote user when the chat bot fails to connect with a human/agent operator. This may occur if none of the registered messenger apps respond to the chat bot server’s chat request. The message should be written in the main locale language.
- app_agent_req_prefix: When the chat flow switches to AI-driven conversation, you can ask the LLM to connect a human via the messenger app by starting its response with a special word or character. Use the guidelines field in the Options tab to tell the LLM when to do so. The chatbot server monitors and analyzes AI-generated responses for the value defined here and connects automatically to a messenger when it is detected, which simplifies chat modes switching without the need of writing scripts.
- locale_XX: For multi-language chat bots, write here the relative path to the locallized RIA file. Change XX by the locale identifier like: AR, EN or FR. You can add as many locale_XX params as you want but avoid redundance as it may raise errors. If you created for example a chat bot that will communicate in 2 languages (chat_bot_en.ria and chat_bot_fr.ria) with remote users. Add locale_FR:chat_bot_fr.ria to chat_bot_en.ria and locale_EN:chat_bot_en.ria to chat_bot_fr.ria params tab. For a complete multi-language example, download Bahia Palace example.
- For chat flows that switches to AI-driven conversations, the following params are to be defined:
- XXX_api_key: When a chat flow is meant to connect to a remote LLM service, you need to copy your API key here to be used by the chat bot server to send prompts and retrieve AI-generated responses. Replace XXX with: ‘chatgpt’ for OpenAI, ‘deepseek’ for DeepSeek, and ‘groq’ for Groq.
- XXX_model: Tells the AI service provider which model to use when generating responses.
- XXX_temperature: The temperature param for the AI-generated responses.
- XXX_max_tokens: Maximum tokens limit for AI-generated responses.
3.3. Global Script tab
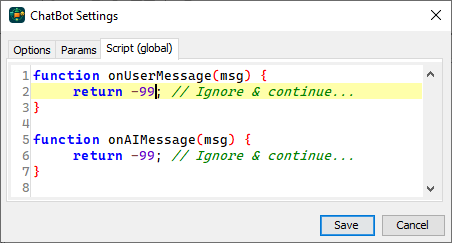
Here, a chat bot creator can write a JavaScript code that is run to handle any AI-generated or user responses. When the chat flow switches from QA mode, the only remaining way to handle a conversation is through a global script. For advanced chat bots, the global script is the best approach to monitor and moderate both AI-driven and operator-driven chats.
Check out Chat4Us-Create User Guide for more details about chat bots scripting